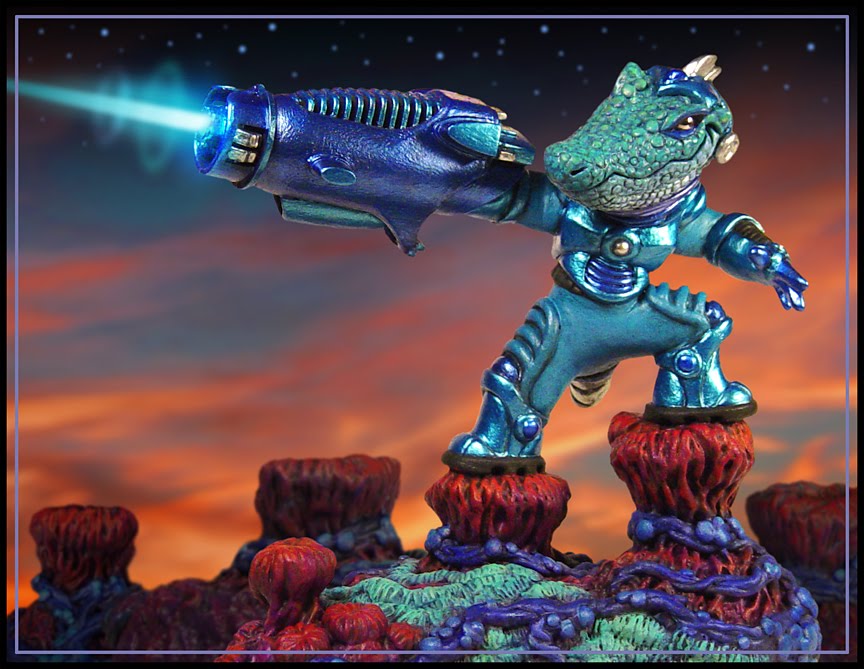
Got a new animated GIF to show..."SPACE GATOR" blasting with his laser cannon! Again...I'm animating one of my static sculpted pieces using Photoshop and ImageReady. I had taken pics from various camera angles of the sculpture. In Photoshop, I cut the torso out from multiple photos. After I repositioned and "grafted" them onto the legs, I could make him move a bit. (Check out my labels to the right, if you want to see how I sculpted this guy.) Just wanted to post this before I have to take a break for a few days...got family comin' to town for a visit. Later, Space Cadets!
Showing posts with label Sculpture-Space Gator. Show all posts
Monday, February 6, 2012
Wednesday, April 14, 2010
SCULPTURE - "Space Gator!" FINISHED

I must say that my enthusiasm waned a bit towards the last few laps. The painting stage took me way too long. I wanted to go with a brighter, comic book feel, but couldn't decide on a color scheme.. After painting it over many times, I finally landed on something I liked.


Friday, April 9, 2010
SCULPTURE - "Space Gator!" pt.8

Let's take a look at the last couple of areas that needing to be completed. This Gator has a cybernetically enhanced tail. I can only speculate about how he lost his organic one...I'm sure it happened during some dangerous mission. On the left is the rough sculpt...I simplified it, then added the robotic details.

As I mentioned last post, I had some damage to repair on the base. I've tinted the photo below, to show what I added. I had big chunks to fill, as well as a lot of smaller cracks. Works out fine...it just means more weird alien terrain!

Here are some turn-around shots of the final sculpt. I hope to get started on the paint job this weekend. But then again...Spring has finally arrived...the yardwork is calling, too.


Sunday, April 4, 2010
SCULPTURE - "Space Gator!" pt.7

I've added some more detail to the chest piece, and I decided to break up the little shape on the back.

Here's the process for one of the legs...started with the simple form...added the thigh padding...and refined the boot design.

Here are more views of the same leg. On the far right is the other bent leg.

One last thing on today's post...some unexpected challenges. While working on the Gator sculpt, cracks formed on the base, due to some minor warping of the wood inside. The pine board is probably too soft...next time I might try hardwood. Also, the Sculpey was too thin in places. In the process of man-handling the base while sculpting, some pieces of the baked Sculpy have fallen off.

Tuesday, March 30, 2010
SCULPTURE - "Space Gator!" pt.6

Making the hand took longer than I planned, because I originally started without an armature inside the fingers. Before I knew it, the hand kept getting larger than I wanted. So after the second failed hand-sculpt, I did what I should've done from the start. I made the hand shape with wire, sculpted the fingers, then baked it. After finishing the glove, I baked it again.

After attaching the hand to the arm, I started working on the chest and neck area. I modified the collar design, and added shoulder guards.

Next, I finished other glove that would mostly be hidden inside the laser cannon, then moved to the Gator's back. I was originally going with an "old school" type backpack rig, with knobs and doo-dads, but I liked the simpler shapes that began forming. So I ended up with a vac-molded kind of look. Not sure what's inside that thing...maybe a power booster or something.

So that's it for now. After this, I move on down to the boots and tail section. Stay tuned!

Thursday, March 25, 2010
SCULPTURE - "Space Gator!" pt.5


The process is very much the same as on all my other sculpts. I began with a very rough head for proportions. I cut off the helmet, since the shapes were all going to change. I started forming the mouth first. The eyes are ball bearings from an old "Lazy Susan". Next I form the eyelids. I kindof liked the pointy eye ridges and cheeks...felt more stylized for space travel!

Now comes the texturing phase. I cut some grooves under the chin, then cut some perpendicular lines from those. I made the tool from a piece of wire that I hammered flat and stuck in a dowel handle...one of my favorite things to sculpt with. I moved on to the bumps over the rest of the head, followed by the standard glazing with thinner.

I then baked the head before proceeding to the helmet stage. I didn't want to mash the details. This also allowed me some flexibility while figuring out how the helmet would be designed. I could sculpt, then peel off the parts I didn't like, then start again.


Friday, March 19, 2010
SCULPTURE - "Space Gator!" pt.4

I've been reading up on some sculpture sites recently to find some techniques for making bumpy skin. I tried a few quick experiments...thought I'd share the results.
The first approach required a "bump stamp". I made a wedge of Sculpey Firm (the gray-colored clay), then used various sized stylist tools with the round ball on the end. I pressed in lots of holes, baked the wedge...then rolled it into some Super Sculpy. Viola...bumpy texture!

I also tried several other tools to make individual bumps. I created a "rake" from sewing pins stuck into epoxy...several passes in the clay makes some good wrinkles. I also used old paint brush handles...I ground out the ends with a dremel tool. A brush tip without the bristles makes a nice circle, too.

Once you create a nice random pattern, you can brush on a light glaze of paint thinner to blend it smoother. Not too much, or you'll lose the delicate details.

I just did a web-search...yep, GATORLAND is still there! Here's a great image by Jason Cordoba from the site's 2009 photo contest. Mighty tasty chicken!

Wednesday, March 17, 2010
SCULPTURE - "Space Gator!" pt.3

Below are the usual steps...I wrap a little bit of thin wire around the armature, so the clay has something to grab onto. Then, I just start adding bits of clay until I get the basic form figured out. To paraphrase Michaelangelo..."I saw the Space Gator in the Sculpey and carved until I set him free." (I know...sayin' that seems wrong somehow.)

I temporarily place the laser cannon on the Gator's arm, so we have a snug fit. I realized after taking this image, that the weapon is upside down. I guess it's personal preference...it looks fine this way, too.

I thought I'd throw in some of the sketches that I drew for inspiration...they're NOT my original designs. I usually pull images from all over the place, just to get my brain working. These are drawings I made based on stuff I found from a couple of websites and Flash Gordon comics. I'll use them as inspiration for figuring out what the Gator's space gear might look like. It's sort of like the assignments we'd get in art school: go copy the works of the "masters". I am blown away by the wonderfully cool artwork at creaturebox.com and agent44.com...super talented guys!

Now things are starting to head in the right direction. I've added some very quick props for basic placement, but may totally go another way as I think it through later.

Off with his head! I'll be working on the face and helmet separately, then bake them, so I won't mess up the detailing. Then I can place them back on the body, and go from there.

To be followed by:
After a while, crocodile!
And a new one from one of my nephews:
Not too soon, ya big baboon!
Saturday, March 13, 2010
SCULPTURE - "Space Gator!" pt.2

I began with covering the wood with a thin layer of Sculpey. I have a really old box of the clay (years old!), that is almost too dry to work with. But it makes pretty good rocks, so I started mashing them on. Once I got the whole thing covered, I started working on the psuedo mushroom-like forms. After glazing it with thinner, the base seemed too big for the size of this piece.

So I peeled off the clay from the edges, and had to rethink things a bit. I had no real game-plan for how everything was going to end up. My wife said it reminded her of Chiclets gum or "pop rocks" candy. Yummy...but not the alien planet look I was going for. Eventually, I went towards a coral reef feel, with some layered lichen fungus growth, and lots of tendril-roots on the mushrooms. Again, I glazed everything with thinner, to blend the surfaces.

After looking the base over, I felt like it needed a bit more. So I twisted in a wood screw for support, then added a few "baby shrooms".

So here we are with the final base. I'm not sure what colors I'll go with, but I'm leaning towards a brighter palette.

Sunday, March 7, 2010
SCULPTURE - "Space Gator!" pt.1

This is a Retro-Future idea...I'm being influenced by old school "Flash Gordon" and some modern comic book/sci-fi elements. My recent trip to Florida reminded me of how much I love alligators...so I'm mixin' in a little Deep South Space Opera, too. So buckle up and let's get started with SPACE GATOR!
After drawing a VERY quick, small sketch above, I needed to make a 
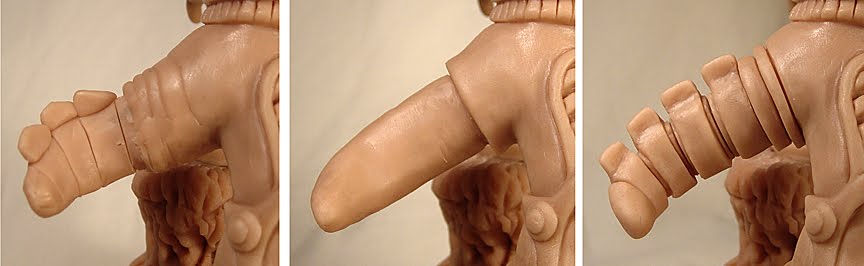
Laser Cannon. The scale of that would dictate the size of the Gator. I love seeing what I can make out of junk...below is the pile of "treasures" I started with. I did some quick drawings of some really cool new "IRON MAN" toys by Hasbro, just to bring in a newer influence for the weaponry.

Below are some shots of the finished Laser Cannon...it will fit over the whole forearm. While I like how the different colors look on the "found objects", I will unify everything with a base coat, then figure out the final colors later.

Here's a fun device I rigged up some time ago to aid me in sculpting. The dowel can be moved around to various holes...the arm can be reconfigured with the wing nuts. It came in handy when doing the base-coat of gray.

Once I gave the Laser a second layer of undercoating (this time black), I needed to create my base and armature. Space Gator will be standing on some kind of alien rock formation. I did a quick sketch to scale, with the wires and dowels that would be inside the sculpture. On the right, the armature is ready to go.

To help me configure the wires inside for the Gator's pose, I slapped on some slabs of Sculpey Clay temporarily. When it looked about right, I pulled off all the Sculpey, to start fresh. The little inset below shows the wire I added for the Gator's tail. The armature can be modified as needed during the sculpting process.

Subscribe to:
Posts (Atom)