Showing posts with label Sculpture-Paper Mache. Show all posts

Wednesday, September 12, 2018

SCULPTURE: Pirate Puppet

Ahoy, Maties!  Once again I return to my love of pirates to create my most recent project...a puppet! I have always loved marionettes. And while this puppet is more like The Muppets in format, I was definitely thinking of old-school paper mache construction.

Below is a series of photos showing the various stages that the head went through. I made several changes along the way, figuring it out as I went. I found the beard and hair at some hobby shops and a costume shop. I also found the soft-foam pirate's hat at a hobby shop. No need to create from scratch, if the props work.
After I got some comments that the pirate looked scary, I decided to soften edges a bit by adding more "skin" around the mouth to cover up the teeth a bit more. I think it helped some.
A couple of weeks after I had completed the puppet head, I was able to focus on building the pirate's body. It had been decades since I had used a sewing machine, so my skills were virtually non-existent for this project. I also had a lot of hand stitching to pull this thing together. I thought that using used children's clothing that I got at a thrift store would make things easier. Wrong. At least I had fun making the tiny little pirate shoes out of cardboard and paper mache! The hand was created with epoxy "Magic Clay".
Here's a view of the stand I made to hang the pirate on. The head of the puppet is VERY heavy, so I added a little "hook" to hold the weight of the body. You can also see the rod that connects to the "hook hand"...it nicely holds the arm forward a bit when on the stand.
Aaaarrrgh...that be the end of the tale of the Puppet Pirate! (Or is it just the beginning?!!!)

Sunday, June 17, 2018

SCULPTURE: "Steampunk Mecha-Gorilla"

Today I finished my paper mache "Mecha-Gorilla"! This might seem like a strange thing to post on FATHER'S DAY, but my Dad would have thought it hilarious. He's been gone for 9 years now, but his love of all things APES continues in me. One of my favorite memories while I was in college was getting to see the original "King Kong" on the big screen with Dad (since he was too scared to finish it as a kid and made his brother take him home)!
As with all of the other paper mache projects I've posted on this blog, the process is basically the same. I construct an armature from cardboard, heavy paper stock, newspapers, hot glue...whatever is a light-weight core to build on. I usually have a piece of wood as a base...in this case, a nice circle that I bought from "Home Depot". I drilled a hole in the back to add wire, so I could hang this on the wall.
The next stage, after the basic form is the way I want it, is to add a "mulch" type paper mache product called "CelluClay". It's about the consistency of thick oatmeal when you add water. After that dries, I add a layer of "Creative Paperclay" for the smoother details. This material acts very much like other water-based clay. You can smooth it down with water on a brush for a nice surface.
Above is the completed sculpture. I've added a few details using bits made of wood, plastic PVC pipe, wooden "rivets" and a couple of plastic bottle caps. The rounded "gears" in the jaw are bottoms of styrofoam cups with peel and stick foam strips for the gear "teeth".

Once the paper mach is dry, I begin the process of painting. It takes a while to build up the effects that I like. I coated this project with a dark brown acrylic paint. Then added glazes of watered-down black, golden brown, along with various layers of metallic copper, silver, gold, and gun-metal gray. I work back and forth, glazing...dry-brushing...glazing, etc...until I get it where I want it. I also used a toothbrush to add various flecks of color and "rusty" areas.
And this is my "Wall of Weirdness" that is finally complete...for now.  


Wednesday, March 7, 2018

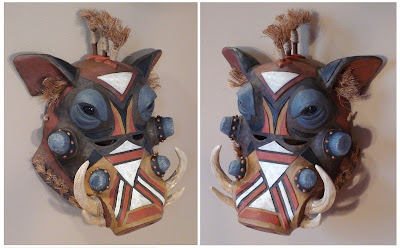
SCULPTURE: "The Warthog Mask"

After the wonderful experience of helping the UMKC Grad Students production of "The Storytelling Project", I was so inspired by the process of mask-making, that I had to create one of my own for my studio wall. I pulled a lot of research from the internet for inspiration and came up with an African-influenced design of a Wart Hog (one of my favorite animals).
The materials are a combination of paper, cardboard, paper mache, grass rope and a bit of aluminum foil. Now that I've finished this one, I still have a nice open space on my wall for another mask!

SCULPTURE: "THE MASK PROJECT" PT.2

Last weekend was the final performance of the UMKC Theater Grad Student's "The Storytelling Project." I wanted to show you a few images of the final costumes and decorated masks (Photos above by Khalif Gillett). While I provided two finished masks that were painted (The Deer Skull and "Fire Head"), the students decorated the "blank" masks and really surprised me with their creativity. The production was colorful, mysterious, funny, and thought-provoking. I was so glad that my friends, Karen Lisondra (Director) and Amado Espinoza (Musical Director) asked me to participate in this production. The 7 Grad students who collaborated on the creation and performance of the show were Khalif Gillett, Chelsea Kinser, Marianne McKenzie, Emilie Leia Karas, Yetunde Felix-Ukwu, Jason Francescon, and Freddy Acevedo. It was a terrific show and I was honored to be able to help with the masks!!

Saturday, January 20, 2018

SCULPTURE: "The Mask Project"

For the last month, I've been working on a fun "little" project. My friends, Amado Espinoza and Karen Lisondra, have been teaching at UMKC this semester. They're working with some Theater Grad Students on the topic of "Storytelling". The original production will include drama, comedy, choreography, music...and MASKS!!

I was asked to advise Karen and Amado on the process of making paper mache masks, to give the students some tips on the process. It became evident that there would not be enough time for the students to make the masks, and it would be too challenging for non-artists to tackle. So...I volunteered to make 7 masks, and get them ready for the students to paint and decorate. I ended up helping with some of the painting, and completely finished two of the masks myself. Above is a "Water/ Fire Creature" that I constructed and painted. I also painted the "Deer Skull" mask. The pic below shows the other masks in various stages of completion. This was the night I got to meet the students...it was a blast to see their faces when they saw the masks for the first time.
The design of the masks were not from my imagination, but rather based on sketches and concepts devised by the students. However, I did have to modify the designs to allow for the students to be able to play didgeridoos during the performances. I was also given some very old-school "drama masks" from the theater department (like the "angry face" in the lower right corner) to use as a base to build upon for 5 of the masks.
Below are some images of the process of construction. I used paper, card board, masking tape, white duct tape, wire, paper mache mulch (Celluclay) and paper "clay". I also painted on Elmer's wood glue to give a solid coating to the forms. I then painted each mask with white latex house paint to give a good foundation to paint upon with acrylic paints.
Here are three masks that have been completed by the students. The "Trickster" was painted by Marianne McKenzie.
This next one was finished out by Khalif Gillett...it's the "Waphuri-Weaver of worlds/ mask of three faces".
The "Branch/Tusks" concept was painted and decorated by Chelsea Kinser.
And finally, here's a close up of the "Deer Skull" that I built and painted...kind of creepy...but I just gave them what they asked for!
After making these masks, I was so inspired, that I wanted to make one for myself to put up on my studio wall. I'll save that for another post, so I can show you all the process stages it went through after I finish it. Until then...ta-ta-for-now!!

Sunday, March 6, 2016

SCULPTURE: "Creature from the Black Lagoon"

It has been almost three months since my last post. I have been busy with various other projects. But I could not resist finishing out my studio wall with another paper mache "monstrosity". The movie "CREATURE FROM THE BLACK LAGOON" came out the year I was born in 1957. It was one of my favorite monsters growing up, and I'd watch it any time it was showing on TV.
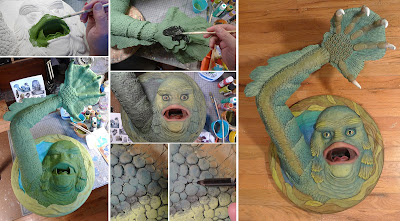
If you have looked at the other two paper mache projects that I've posted on my blog, you will be familiar with the process. I start off gathering a lot of research images, to both inspire me, and to help me with details. I decided I needed to pose as the Creature, to figure out the perspective and proportions. Then I worked up a little composite sketch from all the research I'd found, to match the photo of myself. 
I had found a larger circular piece of wood at the hardware store and began to make my armature out of PVC pipes. I was able to bend the shape of the pipes with a heat gun, to get just the right angles I wanted. I began making the Creature's hand from heavy gauge wire. I used newspaper as filler, and began covering the shapes with masking tape.
Next I began to fill out the basic forms with more newspaper and tape. I decided it would be much easier to sculpt everything, if I kept the base and face, the arm, and the hand in separate pieces for as long as possible. I then added some mulched mache to the shoulder area, and to the forearm, to add support when dried.
The hand was my favorite part to work on. I used the same method as before, filling in the bulk with newspaper and wrapping it all with masking tape. I used wire to form the outer edges of the webbing between the fingers. Then smaller strips of tape were used to fill in the open spaces and create a membrane to add mache to.
Once I had my basic forms built, I began to add paper mache mulch to build up the stucture. When dry after a couple of days, the mache is hard as a rock.
Below are the labor intensive steps to add details to the hands. I used "paper clay" on top of the hardened "mulch mache". The clay is smoother, and easier to sculpt with. It's a little pricey for the amount you get...about $10 for a pound. I think I used perhaps 4 or 5 pounds of the paper clay. I'm guessing that the total price for supplies might have been around $100.
Next, I move on to the face. The eyes are made from two wooden balls I found at a hobby store. I began to build up details in stages. The paper clay shrinks as it dries, so there was a lot of time spent filling in spaces and cracks.
I then sculpted some "seaweed" for the border around the edge of the circle. I used the wet mulch and a spoon to make some basic shapes...almost like icing a cake. Once that was dry, I then used the paper clay to form the shapes of the individual leaves weaving in and out of each other.
The next phase was to attach the arm to the base, and continue with adding details. I think I made a couple of thousand little balls of paper clay to create the bumpy skin texture. That took a couple of days to cover everything. I eventually attached the hand to the arm and filled in the wrist area. Before adding the mulch as support around the wrist and shoulder, I used the PVC glue to hold the armature together.
Below is the final sculpture hanging on my studio wall. Next stop...the paint job!
Painting is probably my favorite part of these projects. As usual, I used acrylic paints, and built up colors with glazes of very wet washes, and also thicker dry brush techniques. I can use color and various values to enhance the sculptural forms. In the lower middle of the photos below, you can see that I had some little patches of white between the bumps. I used a syringe filled with black ink to squirt into the gaps.
Once I had everything painted to my liking, I coated the whole thing with a high gloss acrylic varnish. The details of the paint looked better before adding the varnish, but I wanted a "wet look" since the Creature is coming up out of the water.
Here is "Mr. Gillman" all finished and hanging on my studio wall!
This is how my triad of the "Terrors of the Deep" look all together!