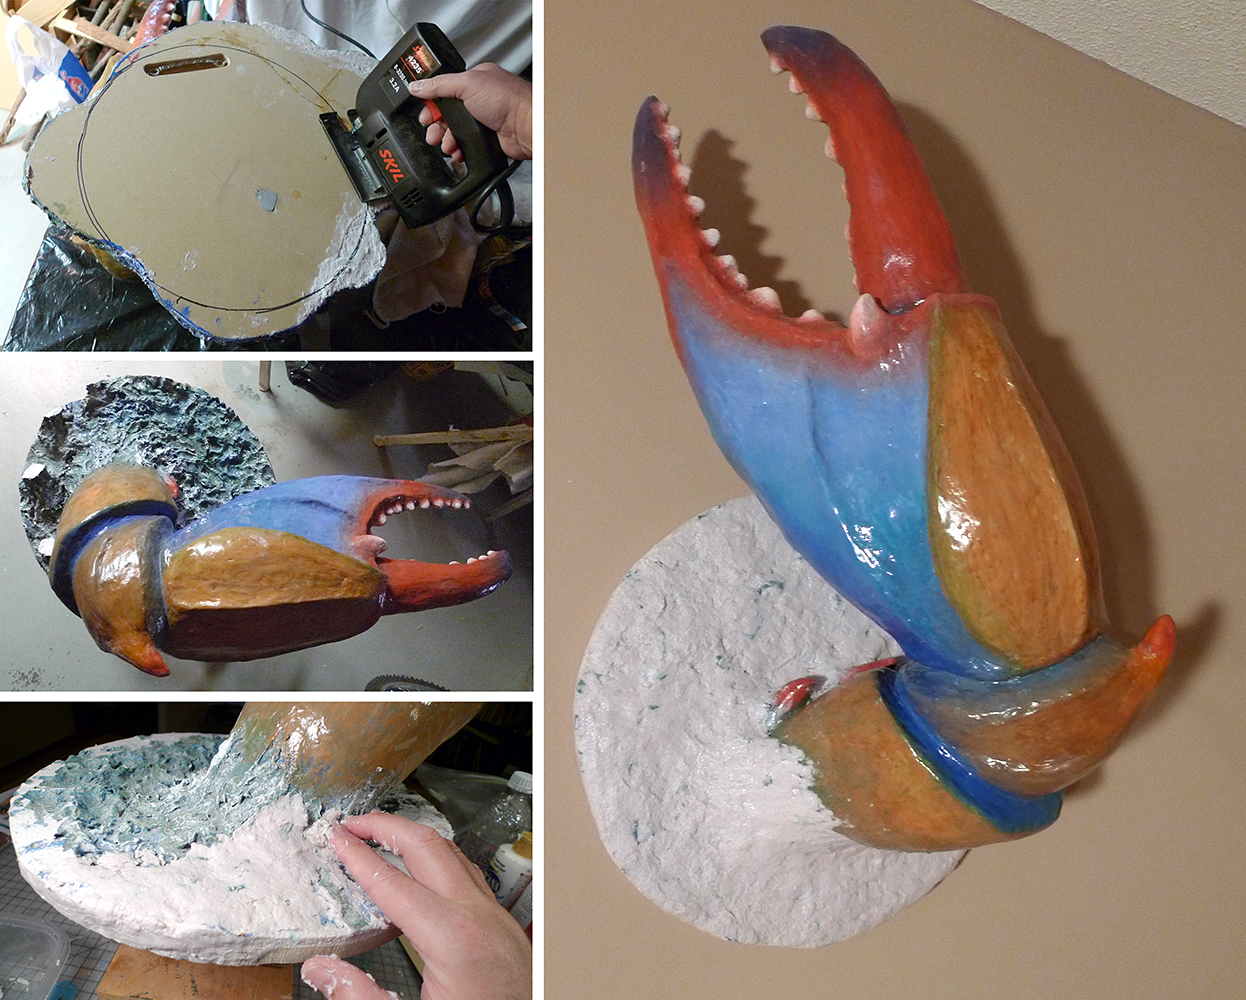
I was not expecting to be posting this second chapter of my GIANT CRAB CLAW. But the same day I had finished this creature (see my previous post below), I was having some misgivings about my final design. The "crab trap" did not turn out like I had originally envisioned...it was quite a bit larger than I wanted. I conducted a little POLL on Facebook, and the majority of responders liked a simpler approach. So...the next day I went to the basement with my claw...and cut off all of the "trap" (many hours and days of work).
Below you can see that I removed the outer edges of the weird shape that was the "water" and cut out a circle. I felt like the circular shape went better with the motif of the companion piece (Giant Squid) porthole. I filled in all of the turbulent water surfaces with more mulch paper mache. I then sanded down the surface to try to get it a bit smoother.
I decided to play with some Art Nouveau influences on the new base. I drew up a design of swirling waves. I simplified it a bit from the drawing below, but liked the "mosaic" feel instead of going with a more sculptural approach.
I bought some sheets of foam rubber with peel and stick backing from the hobby store. I freehanded the swirl shapes that were influenced by my sketch. But I had to modify them as I went, since this was going onto a dimensional sculpture. It was like creating a puzzle. Once I had the basic shapes in place, I cut out little grooves to form individual "tiles" for my mosaic.
Here is the finished mosaic, before paint was applied.
I mixed up some GESSO with a bit of acrylic paint, to start building a good base coat. I then switched up the colors, so I knew where I was going. I layered in three different colors, then finished it all with a watered-down glaze of dull brown washes. This unified the whole thing, and allowed color to get into all of the grooves between the pieces.
I then began to paint all of the details with "metallic" acrylic paints. I had five different colors that I used. I liked the "pearlized" sparkle that looked different from the surface of the crab. Then I gave the whole base another wash of the thinned down brown. This gave a bit of aging look to everything, and warmed up the palette a bit.
I am happy with the final results of this, and like the way the simpler curving shapes echo what is happening to the swirls of the squid sculpture next to the crab claw.
Here's how they both look on my studio wall! I might make one more sculpture to go on the left side, to have a "trio" of giant critters from the deep.
It's time to post my latest paper mache project: THE GIANT BLUE CRAB CLAW!!!
After I had made my Giant Squid some months ago, I felt like trying a companion piece to go on my studio wall. I'll walk you through the steps to build this. Above, you can see the miniature sculpt that I made, just to get a general idea for proportions. I did a little photoshop magic, and made enlarged it to approximately the size it would be to fit the space next to the door. I also added a bit of color.
Below is the basic armature. I secured a piece of PVC pipe to a board, and added wire for the shape of the claw. Using a heat gun (thanks for the tip, Clint!), I was able to bend the plastic pipe to the proper angle. I filled in the shape with newspapers, and masking tape. I used a drill and jigsaw to cut a hole for the framing wire and screw-eyes for hanging on the wall.
Once I had the basic shape constructed from newspaper and tape, I mixed up paper mache mulch (found at most hobby shops), and gave everything a good coating. I let it dry for a couple of days. I made an old-school style crab/lobster trap that would give the base a bit of interest and add some action to the scene. Looking at the final...I probably should have just simplified the whole thing without the trap. I think it's a little larger than intended. The trap is made from strips of styrofoam that I had cut from some packing inside a box. It was light and worked perfectly for what I needed.
I then began adding more details to the claws following some photos that I had taken from a trip to Maryland, and also images I found online. I also covered the styrofoam "boards" with the mache mulch. Once the trap was dried, I was able to start adding "water splashes" to the backboard. As happens often on my projects, things go off course a little...the trap was too large to fit on the base board. So I added on more wood, and then extended the edges with more paper mache. You will notice the masking tape with plastic wrap at the bottom of each "board" of the trap. I wanted to be able to remove the trap when I painted the crab. When the mache dried...it left little "sockets" in the water.
I used "paper clay" (also found at the hobby shop) to spread on top of the rougher mache surface. This allowed me to get smoother details and transitions on the forms.
Next, I added the same paper clay to the boards of the trap. I used a wooden tool to cut woodgrain grooves into the boards, and added little nails.
The most enjoyable part of any project for me is the painting of it. Since this was a blue crab, I gave it a base coat of various blues and aquas with acrylic paint. I blocked in the general color shapes, then dry-brushed various transitional colors. I added a glaze of very watered down golden brown. Then repeated the process with brighter, cleaner paint to punch the colors.
I gave the trap a base coat of brown, then glazed it with thinner black paint. I then dry-brushed some gray on top to give it an old water-logged look. A little bit of rusty red on the nails finished it off.
Once I had the crab and trap painted, I gave the "water" a wash of greenish ochre over the blues. The last touch was dry-brushing some white to give some foamy splashes.
I covered everything with an acrylic varnish (water-based) to give it a nice shine.
I glued the "wooden trap" back into place, then covered the areas at the base of each board with more mache, to cover up the "sockets" and to add more foamy splashes. I painted the new additions, and coated them with varnish.
Here is the FINAL GIANT CRAB CLAW hanging on my studio wall!!
Just for the heck of it, I compared my original rough little sculpture and photo comp with the final sculpted version. It's a bit larger than I original intended (mostly because I had to make the backboard larger), but I like how it turned out overall.