Sunday, January 30, 2011

TABLETOP GAMING - "Making a MAMMOTH CAVE" Pt.4

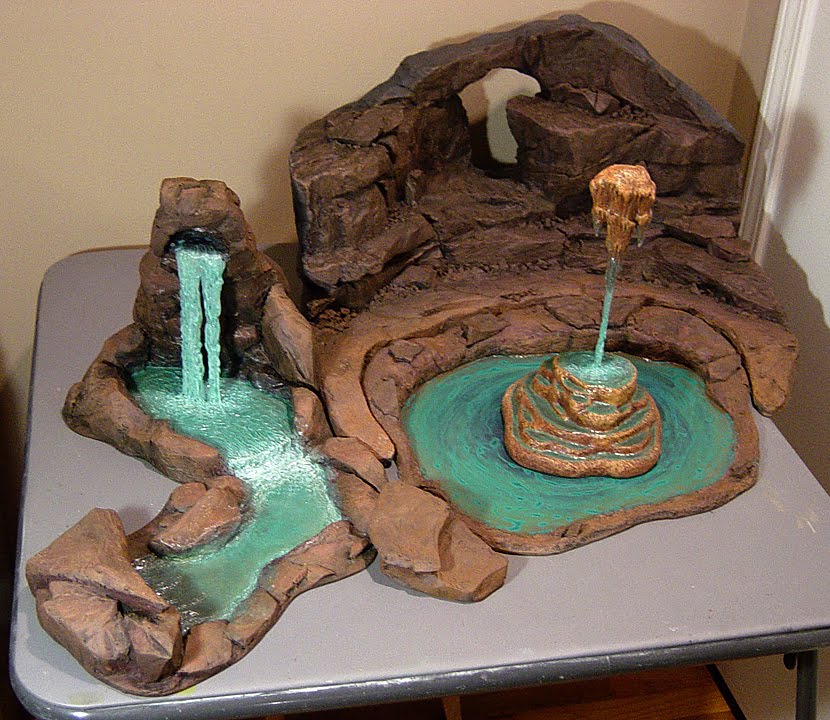
Got a new piece ready for the Mammoth Cave theme...a ROCK WATERFALL!

The runoff stream disappears under some boulders into a vertical shaft of darkness. Any brave explorers willing to repel down and see what's there?

I made this set in two sections, to make it easier to store them. They could be used separately as well.

Since I have already shown the basic building process in earlier posts, I won't take too much time explaining things. However, this is a good example of what you can do with leftover chunks of pink foam. I glued together several random pieces, and just started carving away with the hot wire tool. It makes it challenging, but also gives it more interest than with a large flat slab of foam.

I decided to raise the water level of the falls a little higher than the lower section of the stream. So I just carved out a groove into the big rocks...added some little pieces of foam to a board, then hot-glued them into place.

Here is the set with all the carving done.

I did the usual process of covering everything with spackling paste, for added rock texture...when dry, I sanded off the sharp edges. Then I made a mix of wood glue and dark brown acrylic paint, and gave a base coat to the whole thing. When dry...I painted all the rocks and water areas to match with the other sets in this series.

Okay...here's how I made the waterfall. I got a large sandwich bag...cut a strip about two inches wide from the edge of the bag...then spray-glued the inside of the bag together, so it would be a sturdier and thicker piece of plastic.

Next, I taped the plastic to a board...then I used a hot glue gun to make strips all up and down the plastic. I left a gap in the middle, to add interest. When the glue had cooled down, I cut off the excess baggy, and trimmed the ends of the glue near the tape.

Once I had hot-glued the falls into place, I used the hot-glue gun to add splashes to the water, and spillway. I gave the water a bit of aqua-blue glazing with very thin acrylic...then added a bit of white paint to the splashes and ripples.

Here are all the set pieces so far! Actually, I'm getting close to being done with this whole project. Even though I have ideas for making lots more sets, I've been making terrain every week since mid-December...I think I'm ready for a break. But I'll hang in there a little longer...I've got some stalagmites to make!

Sunday, January 23, 2011

TABLETOP GAMING - "Making a MAMMOTH CAVE" Pt.3

I finished a new Cave piece...a Stalactite Waterfall with Cascading Calcite Pools!

I won't be spending as much time showing the process on many of the upcoming posts. Mostly because it gets a bit repetitious with techniques. So, here's a quick review of how I constructed this one. I carved my base structure from styrofoam using the hot wire cutter. I wasn't happy with the first stalactite shape, so I made another. The cascading pools were made from 3 sections of foam spray-mounted together, then carved into multiple levels.

I covered the foam core with paper mache. I let the first stage dry, before adding on the little cone pieces and blending them in. I then coated everything with wood glue to give the surface a smoother texture, and to give it a harder shell. I did the same process for the Calcite Pools base.

Once I had painted everything, I got a heavy-gauge wire from a plastic clothes hanger (with the clips on it) and pushed it into the base and stalactite (with a little wood glue on the wire). I then began to make the water effects with a hot glue gun. As I covered the wire, I went back and reshaped some of the glue by rubbing and melting it with the hot point of the glue gun. I also added "splashes" and ripples in the base pool.

When that had set up, I finished off the water with a glaze of white, a glaze of aqua, then coated it all with varnish for a nice shine.

Here's a shot of the piece in the lake. But it could also be a stand-alone somewhere else in the cave. I know it looks like it's floating in the air, but the intention is that you have to imagine the cave ceiling above it. Then again...could be cool to have a levitating fountain.

Tuesday, January 18, 2011

TABLETOP GAMING - "Making a MAMMOTH CAVE" Pt.2

"Enter The Caverns, If Ye Dare!"

I finished painting the MAMMOTH CAVE ENTRANCE tonight, and decided to stay up past my bedtime to post it. So "phase one" is now complete.

Last time, I had left you with the main structure covered in spackling paste. I won't show you the next two steps: I covered everything with a coating of wood glue, then painted the cave parts with a gray acrylic/gesso mixture. But I'll walk you through the finishing touches. I wanted to add a few more details, so I made a "bag 0' boulders" to have on hand. I also needed some smaller "rocks", so I put some chunks of the pink insulation foam into a blender, and "Viola!"

After strategically gluing the bigger boulders throughout the cave, I then mixed some sand into the wood glue. I painted that in random places where rocks had "fallen" here and there on the cave floor.

Here's the transition from "no rocks" to "rocks" to "rocks painted gray".

And here's the whole scene with the final paint scheme! I wanted the water to be a bit foreboding...it's not the pristine clear lake that some caves offer. This one goes really deep...with potential "scary thingies" livin' in there!!
One thing I did to differentiate the "outside" of the mountain from the inside of the cave, was to paint things a bit "cooler" in tones. The stone is more slate gray, with glazes of brown.

Finally, here are the three separate terrain pieces that can be configured together or apart, depending on the needs of the game.
More to come...got some Stalactites and Stalagmites to make!

Thursday, January 13, 2011

TABLETOP GAMING - "Making a MAMMOTH CAVE" Pt.1

Here we go, fellow Spelunkers! Time for a "Mammoth Cave" adventure!

I've been busy this week on phase one of a multi-part scenario for my friend, Jaye. I got inspired to tackle this project after seeing an incredible series of photographs from National Geographic of a newly discovered gigantic cave in Vietnam. It's now considered to be the largest in the world! (Check out the images HERE!)

My imagination took off, and I began to sketch up some various components that I plan to make over the course of the next few weeks.

Below are some other images I gathered off the web for inspiration and details. I also bought a cool book at a half-priced store featuring the "Great Caves" of the world.

The first component I wanted to make was the cave entrance and a cavern lake. The lake can be removed and placed on a different part of the gaming table. I began with a rough sketch on board, then cut out both pieces with a jigsaw.

Jaye let me borrow his hot wire foam cutting tools, and I began to cut out the various shapes. I then glued them together with "SUPER 77" spray to form the basic configuration.

Next, I continued to carve the "mountain" with the hot wire tool, to shape more convincing rock contours, and to help hide the seams of where the foam was stacked.

There were some obvious gaps in the construction, so I filled cracks with a hot glue gun. Then I began to cover the whole sculpture with spackling paste. I used a putty knife, like spreading icing, then went back over the surface with a cheap rough-bristle brush. This broke up the surface into more irregular textures. I will sand off the little "nuggets" when it dries...but not too much. I don't want to lose the rock-like textures. Because of the size of this cave terrain piece, it took me two nights work to cover it all with the spackle.

Here's where I left it tonight...drying. I also made a little "boulder island" that can be placed on the lake, or used as a prop on the cave floor. I'll continue working on it over the long weekend (Martin Luther King Holiday on Monday). To give it a bit more interest, I'll add some rock "debris", where various sized boulders have fallen here and there. Stay tuned!

Friday, January 7, 2011

TABLETOP GAMING - "Making DESERT DUNES & River" Pt.5

The RIVER is now FINISHED...and so is this hexagon-based project!

Below are all of the final pieces, painted and ready for game-day.

I tried a different technique for making the river banks than I've use on other river projects. (Check out my earlier post on "Making Rivers".) As you see below, I've got all my pieces cut out of masonite board. This time, I decided to use PAPER MACHE for the edges of the river.

I'm using "instant paper mache" that is a dry, papery mulch in a bag...just add water to the stuff in a mixing bowl, and squish it up with your hands. I preferred a consistancy similar to tuna fish salad...has a nice texture that I liked. If you add more water, you can get a smoother surface, but it does take a longer to dry. I purposely applied the mache quickly, and didn't get too fussy with it. The rougher surface helps for making it look like foliage at the water's edge when painted.

I decided to show a few of the stages these went through when I painted them. It took a lot longer than I expected...just couldn't land on the colors I liked. And I had to repeat the process of the glazes for all 12 pieces in the set...each had to look consistant. A long evening!

Here are the segments ready for two coats of high gloss varnish...and the shiny "water" below.

This little group of tiles are pretty versatile for creating many configurations. Good luck making your own river set!

Spoiler Alert! I'm going to keep going with making more gaming terrain for my buddy Jaye. Stay tuned for some cool ideas I have for a MAMMOTH CAVE scenario!!