AHOY, THAR, MATEYS! It's time to show you my latest project...A PIRATE PUPPET TOY!
It's been a while since I've worked on one of my "automata" characters. For those who have not followed along before when I've built one of these, you'll soon find out that part of the fun for me is NOT KNOWING WHAT I'M DOING! I'm not an engineer, so I have to do a bit of homework to figure out how to make these little animated toys do what I want. I will be posting as I create each stage of development, so stay tuned. This will be a "mixed medium" toy...I'll be gluing fake fur on this guy for his hair and beard, and will attempt to SEW a little tiny costume!!
Below are some of the many sketches I've done along the way to decide what I want this little guy to look like, and the mechanisms I'll need to make it work.
Next in the process is gathering "research"...I love this stage! I get inspired by photos, sculptures, movies.
Since this little pirate is going to be a "puppet", I needed to figure out how to make the mouth open and close. It's a combination of a "marionette" string puppet, and a "ventriloquist" dummy. But I want to hide the mechanisms inside. So part of my research was to help me explore and adapt some time-tested tricks of the trade.
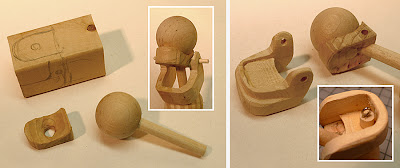
Okay...let's start with the basic construction of the HEAD. I used a wooden ball, dowels, and a block of wood to create the "skull" that would be underneath the sculpted face. Under the front of the lower jaw, I added a screw-eye for the string to pull the mouth open.
I created a spring mechanism much like one used in a ventriloquist dummy head. This will keep the mouth closed until the string is pulled to make him "talk". The spring came from some discarded electronic thing I've dismantled for parts. I often use "found objects" to repurpose for my projects.
I made some nasty big teeth from PLUMBERS EPOXY, instead of my usual SCULPY, since it would need to be stronger, and not chip or break when the mouth "talks". I also carved a bit of wood to protect the spring...then sculpted a notch on the back of the skull to hold it in place better.
I continue with sculpting each section of the face with SUPER SCULPY (not the white "regular" Sculpy which is too soft.) The parts of the upper skull that are gray in color are made from a blend of "Sculpy FIRM" and Super Sculpy.
The head is pretty close to being finished here...complete with eye-patch and nasty scar. I will be adding a hat and head-scarf later, after I paint it and glue on the hair and beard. That'll be all fer now, ye land-lubbers! ARRRRGG!!


No comments:
Post a Comment