Wednesday, September 12, 2018

SCULPTURE: Pirate Puppet

Ahoy, Maties!  Once again I return to my love of pirates to create my most recent project...a puppet! I have always loved marionettes. And while this puppet is more like The Muppets in format, I was definitely thinking of old-school paper mache construction.

Below is a series of photos showing the various stages that the head went through. I made several changes along the way, figuring it out as I went. I found the beard and hair at some hobby shops and a costume shop. I also found the soft-foam pirate's hat at a hobby shop. No need to create from scratch, if the props work.
After I got some comments that the pirate looked scary, I decided to soften edges a bit by adding more "skin" around the mouth to cover up the teeth a bit more. I think it helped some.
A couple of weeks after I had completed the puppet head, I was able to focus on building the pirate's body. It had been decades since I had used a sewing machine, so my skills were virtually non-existent for this project. I also had a lot of hand stitching to pull this thing together. I thought that using used children's clothing that I got at a thrift store would make things easier. Wrong. At least I had fun making the tiny little pirate shoes out of cardboard and paper mache! The hand was created with epoxy "Magic Clay".
Here's a view of the stand I made to hang the pirate on. The head of the puppet is VERY heavy, so I added a little "hook" to hold the weight of the body. You can also see the rod that connects to the "hook hand"...it nicely holds the arm forward a bit when on the stand.
Aaaarrrgh...that be the end of the tale of the Puppet Pirate! (Or is it just the beginning?!!!)

Tuesday, July 24, 2018

CHALK ART: "Under The Sea"

Last Friday, I worked up another driveway chalk mural for the kids in the neighborhood to draw on. You can see the "before" and "after" version, once the young artists (and some parents) added their own sea creatures. Apparently, this is "Shark Week" on the Discovery Channel, as I write this. Great timing!

Thursday, June 28, 2018

CHALK ART: "Stay Cool!"

I must be in my "ironic phase" as an artist...I just finished my "Stay Cool" chalk mural in the blazing 100 degree summer heat. Since it's been raining so much, I've waited for months to draw on my driveway with some new supplies I've had since Christmas. I spent about 5 hours on this yesterday, and just melted. I put the finishing touches on it this morning at around 7:00 a.m. which felt relatively "chilly". Enjoy!
Update!  
I decided to add something for the kiddos this evening. Careful...the ice is slippery!! 


Sunday, June 17, 2018

SCULPTURE: "Steampunk Mecha-Gorilla"

Today I finished my paper mache "Mecha-Gorilla"! This might seem like a strange thing to post on FATHER'S DAY, but my Dad would have thought it hilarious. He's been gone for 9 years now, but his love of all things APES continues in me. One of my favorite memories while I was in college was getting to see the original "King Kong" on the big screen with Dad (since he was too scared to finish it as a kid and made his brother take him home)!
As with all of the other paper mache projects I've posted on this blog, the process is basically the same. I construct an armature from cardboard, heavy paper stock, newspapers, hot glue...whatever is a light-weight core to build on. I usually have a piece of wood as a base...in this case, a nice circle that I bought from "Home Depot". I drilled a hole in the back to add wire, so I could hang this on the wall.
The next stage, after the basic form is the way I want it, is to add a "mulch" type paper mache product called "CelluClay". It's about the consistency of thick oatmeal when you add water. After that dries, I add a layer of "Creative Paperclay" for the smoother details. This material acts very much like other water-based clay. You can smooth it down with water on a brush for a nice surface.
Above is the completed sculpture. I've added a few details using bits made of wood, plastic PVC pipe, wooden "rivets" and a couple of plastic bottle caps. The rounded "gears" in the jaw are bottoms of styrofoam cups with peel and stick foam strips for the gear "teeth".

Once the paper mach is dry, I begin the process of painting. It takes a while to build up the effects that I like. I coated this project with a dark brown acrylic paint. Then added glazes of watered-down black, golden brown, along with various layers of metallic copper, silver, gold, and gun-metal gray. I work back and forth, glazing...dry-brushing...glazing, etc...until I get it where I want it. I also used a toothbrush to add various flecks of color and "rusty" areas.
And this is my "Wall of Weirdness" that is finally complete...for now.  


Friday, June 15, 2018

SKETCHBOOK: "A Week in Colorado"


I recently returned home from a week of visiting my daughter Jenni and her beau Brad (and also house/cat sitting for 2.5 days) in Longmont, Colorado (northeast of Boulder). I was really looking forward to my "free time"...it had been a long while since I've been out and about drawing. I sketched at the Denver Museum of Nature and Science, Red Rocks, Eldorado Canyon State Park, and then on Hwy 66 near Jen and Brad's house. A lovely time with gorgeous weather!
 

Thursday, April 26, 2018

SCULPTURE: Monster Head Pt. 5

It's been a while since I've played with some Sculpy clay. I got inspired by some of the recent movies with giant monsters in them ("Rampage" and "Pacific Rim 2"). It was time to return to my series of sculpts featuring "Kaiju" (giant monster) heads. For your viewing pleasure...an ICE DRAGON!
I began with a core of aluminum foil and wire. The wire is set into some holes drilled into the wooden base. I originally thought I would add some bits of dragon wings to the base, but decided not to.
I kept the head as a separate element, so I could sculpt the finer details. Little by little, I added more horns and skin textures. I also worked down the front of the neck with some horned armor.
You will see below left that I started adding armor plating to the sides and back of the neck. But I just didn't like how it was going, so I scraped it all off and started over.
As usual, I painted the whole sculpture in a unifying base coat. Since this was to be an ice dragon, I wanted the colors to be a variety of "cold" colors. I gave the mid-tone blue a watered-down acrylic wash of a darker blue. When that dried, I dry-brushed several layers of aqua, green, blue and purple.
Below is the finished paint job.
My new Ice Dragon fits nicely on the shelf with my other "Kaiju" monster heads. I'm sure I'll add some more to the family.

Sunday, March 25, 2018

SCULPTURE: Flying Monkey Upgrade

Nine years ago, I sculpted my little series called the "Flying Monkey Squadron". It was inspired by the flying monkeys of "Wizard of Oz" with a Steampunk/WWI Ace Pilot flavor. This week, I decided to do a makeover and brighten up the color palette. I was again inspired...this time by Fire Fighters and the latest run of super hero movies. Now these guys are a group of Special Ops Rescue Rangers! 

If you want to see step-by-step how I made everything, just click on the LABEL in the right-side column of this blog..."SCULPTURE: Flying Monkey Squadron".

Friday, March 9, 2018

SCULPTURE: "Baby Groot"

Yesterday, my eldest daughter, Jenni, opened a surprise early birthday present that I made for her (at the suggestion of her boyfriend, Brad). She is obsessed with cute little "Baby Groot" from the movie "Guardians of the Galaxy 2" and was delighted to get one of her very own.
Before I began to actually sculpt, I gathered tons of images of "Baby Groot" from the web...front, back side views...whatever was available for research. As with most of my sculptures made from "Super Sculpy" clay, I started the process with an armature of aluminum wire set into a wooden base. I built up the form with aluminum foil, then added the clay in stages. I used a "hot air gun" from the hardware store (for stripping paint) to "cook" the sculpture. You can add more clay and keep sculpting after each baking, if you wish. This helps to lock in the details, so they wont be "mushed" from subsequent sculpting (by accident, usually). Once the sculpting phase was done, I used glazes of acrylic paints to layer in the various tones...darker washes to settle into the cracks, then dry-brushing lighter colors for the highlights. I used metal ball-bearings for the eyes (scraping the paint off at the end, so they'd shine).

Wednesday, March 7, 2018

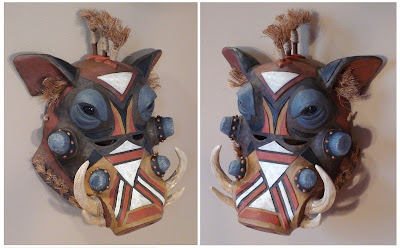
SCULPTURE: "The Warthog Mask"

After the wonderful experience of helping the UMKC Grad Students production of "The Storytelling Project", I was so inspired by the process of mask-making, that I had to create one of my own for my studio wall. I pulled a lot of research from the internet for inspiration and came up with an African-influenced design of a Wart Hog (one of my favorite animals).
The materials are a combination of paper, cardboard, paper mache, grass rope and a bit of aluminum foil. Now that I've finished this one, I still have a nice open space on my wall for another mask!

SCULPTURE: "THE MASK PROJECT" PT.2

Last weekend was the final performance of the UMKC Theater Grad Student's "The Storytelling Project." I wanted to show you a few images of the final costumes and decorated masks (Photos above by Khalif Gillett). While I provided two finished masks that were painted (The Deer Skull and "Fire Head"), the students decorated the "blank" masks and really surprised me with their creativity. The production was colorful, mysterious, funny, and thought-provoking. I was so glad that my friends, Karen Lisondra (Director) and Amado Espinoza (Musical Director) asked me to participate in this production. The 7 Grad students who collaborated on the creation and performance of the show were Khalif Gillett, Chelsea Kinser, Marianne McKenzie, Emilie Leia Karas, Yetunde Felix-Ukwu, Jason Francescon, and Freddy Acevedo. It was a terrific show and I was honored to be able to help with the masks!!

Saturday, January 20, 2018

SCULPTURE: "The Mask Project"

For the last month, I've been working on a fun "little" project. My friends, Amado Espinoza and Karen Lisondra, have been teaching at UMKC this semester. They're working with some Theater Grad Students on the topic of "Storytelling". The original production will include drama, comedy, choreography, music...and MASKS!!

I was asked to advise Karen and Amado on the process of making paper mache masks, to give the students some tips on the process. It became evident that there would not be enough time for the students to make the masks, and it would be too challenging for non-artists to tackle. So...I volunteered to make 7 masks, and get them ready for the students to paint and decorate. I ended up helping with some of the painting, and completely finished two of the masks myself. Above is a "Water/ Fire Creature" that I constructed and painted. I also painted the "Deer Skull" mask. The pic below shows the other masks in various stages of completion. This was the night I got to meet the students...it was a blast to see their faces when they saw the masks for the first time.
The design of the masks were not from my imagination, but rather based on sketches and concepts devised by the students. However, I did have to modify the designs to allow for the students to be able to play didgeridoos during the performances. I was also given some very old-school "drama masks" from the theater department (like the "angry face" in the lower right corner) to use as a base to build upon for 5 of the masks.
Below are some images of the process of construction. I used paper, card board, masking tape, white duct tape, wire, paper mache mulch (Celluclay) and paper "clay". I also painted on Elmer's wood glue to give a solid coating to the forms. I then painted each mask with white latex house paint to give a good foundation to paint upon with acrylic paints.
Here are three masks that have been completed by the students. The "Trickster" was painted by Marianne McKenzie.
This next one was finished out by Khalif Gillett...it's the "Waphuri-Weaver of worlds/ mask of three faces".
The "Branch/Tusks" concept was painted and decorated by Chelsea Kinser.
And finally, here's a close up of the "Deer Skull" that I built and painted...kind of creepy...but I just gave them what they asked for!
After making these masks, I was so inspired, that I wanted to make one for myself to put up on my studio wall. I'll save that for another post, so I can show you all the process stages it went through after I finish it. Until then...ta-ta-for-now!!