
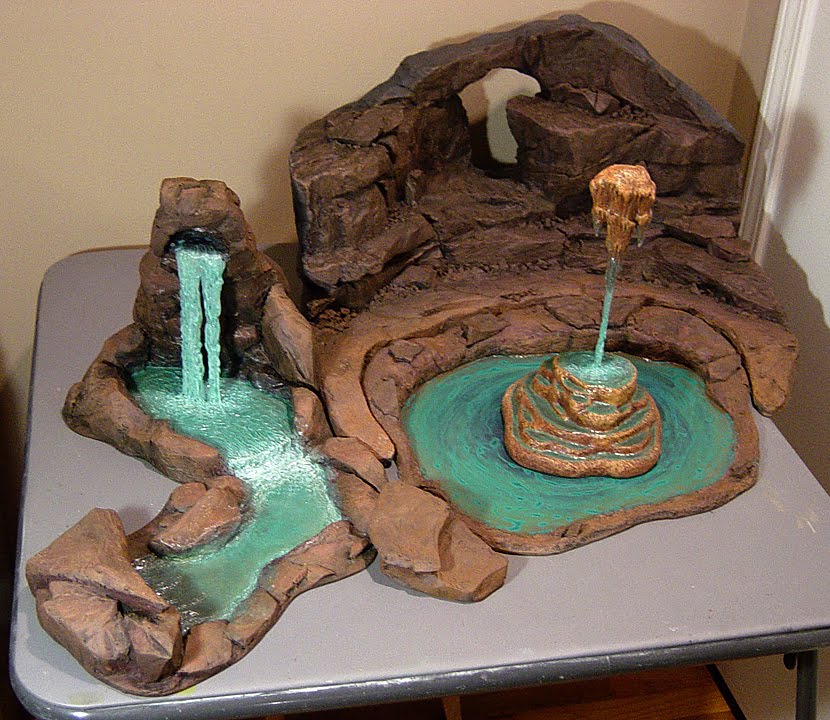
 Got a new piece ready for the Mammoth Cave theme...a ROCK WATERFALL!
The runoff stream disappears under some boulders into a vertical shaft of darkness. Any brave explorers willing to repel down and see what's there?


I made this set in two sections, to make it easier to store them. They could be used separately as well.


Since I have already shown the basic building process in earlier posts, I won't take too much time explaining things. However, this is a good example of what you can do with leftover chunks of pink foam. I glued together several random pieces, and just started carving away with the hot wire tool. It makes it challenging, but also gives it more interest than with a large flat slab of foam.

I decided to raise the water level of the falls a little higher than the lower section of the stream. So I just carved out a groove into the big rocks...added some little pieces of foam to a board, then hot-glued them into place.

Here is the set with all the carving done.

I did the usual process of covering everything with spackling paste, for added rock texture...when dry, I sanded off the sharp edges. Then I made a mix of wood glue and dark brown acrylic paint, and gave a base coat to the whole thing. When dry...I painted all the rocks and water areas to match with the other sets in this series.

Okay...here's how I made the waterfall. I got a large sandwich bag...cut a strip about two inches wide from the edge of the bag...then spray-glued the inside of the bag together, so it would be a sturdier and thicker piece of plastic.

Next, I taped the plastic to a board...then I used a hot glue gun to make strips all up and down the plastic. I left a gap in the middle, to add interest. When the glue had cooled down, I cut off the excess baggy, and trimmed the ends of the glue near the tape.

Once I had hot-glued the falls into place, I used the hot-glue gun to add splashes to the water, and spillway. I gave the water a bit of aqua-blue glazing with very thin acrylic...then added a bit of white paint to the splashes and ripples.


Here are all the set pieces so far! Actually, I'm getting close to being done with this whole project. Even though I have ideas for making lots more sets, I've been making terrain every week since mid-December...I think I'm ready for a break. But I'll hang in there a little longer...I've got some stalagmites to make!

17 comments:
AWESOME! Those caves are brilliant!
Good job, look forward to he final piece!
Superb. Words fail me. I am deeply impressed.
I want to know how much you're charging this guy to make these scenery sets for him? :)
When he gets together with all his other tabletop gaming buddies I'm sure there's a lot of ooo's and ahhh's.
Awesome work, as always.
The only brave explorers I know are Sarah Jane and Cameron... they would jump in with out thinking!!!
These are by far the best fun artsy things you've made!!!
Can't wait to see the next "out of this world" creation you have tucked in that brain of yours...
SCARY!!!! XO
Warren has my love. Isn't that payment enough?
-J
Thanks everybody!! You are too kind. Maybe I'll scale everything up and build some giant sets out of concrete for a ZOO or something. Or maybe just turn my basement into a REAL "Man Cave".
I make these 'cause it's FUN...and also for the brief moments of joy that it gives to Baron J. He doesn't smile enough.
I wouldn't smile either if I had to wear that uniform and helmet! The hat looks too tight and the uniform... the colors are not flattering in the least! That coupled with the fact that his goatee is white and his mustache is black would make me sore at the world too!
hehe
"Awesome", "ooooh" and "aaaaah" were words that came to my mind, too. This latest 2 piece waterfall set is excellent!
Wowwy wow wow!
Holy Crap!
Re-mark-able!
I gotta start gaming again.
oh my goodness u are amazing oh me I wish I had half the talent u have u r blessed big time from Michelle Long
I love the caves you have created... these are also a great project for crafty Sunday School teachers. Thanks for sharing these awesome tutorials!!
that is awesome, I was wondering if the waterfalls made with hot glue would hold up outside, I have a ton of fairy gardens and would love to add something like that to some of the areas.
Debohra...I see no reason why this technique should not work outside, provided that the areas that you are adding the "water fall" to is of materials that would do okay if it got wet (i.e. rocks, or painted wood). It's been a while since I have read through my own post...makes me want to build some miniature stuff again! Dioramas are fun...good luck with your fairy garden!
very impressed with your work,unique and very realistic
Where do you get the pink foam to start molding and creating these amazing caves?!? These are beyond amazing! :D
Hello, Gabrielle. I find the pink styrofoam in my local hardware store (Home Depot, in my town). It is in the "insulation" area and comes in large sheets about 4'x6' and is around 3" thick.
Post a Comment