Today was my second "sketch-crawl" event with the URBAN SKETCHERS-MIDWEST group. It was a gorgeous day, as we met at the Excelsior Springs Airport, to enjoy the annual "Fly In and BBQ" weekend! I had the chance to meet a few more artists than before. And the BBQ tasted great!
Above is a portrait I drew of our illustrious leader of the group, Cathy "Kate" Johnson. However she is sitting right in front of the tractor that pulls planes into the hanger. So you'll have to use your imagination. :) Below is where I was sitting...some folks like to see a photo of the viewpoint that artists are drawing from...so here ya go!
The next sketch was a view of earlier in the day, when there were about 25 planes all around. By the time we left, there were only about 5 left on the grassy area next to the runway.
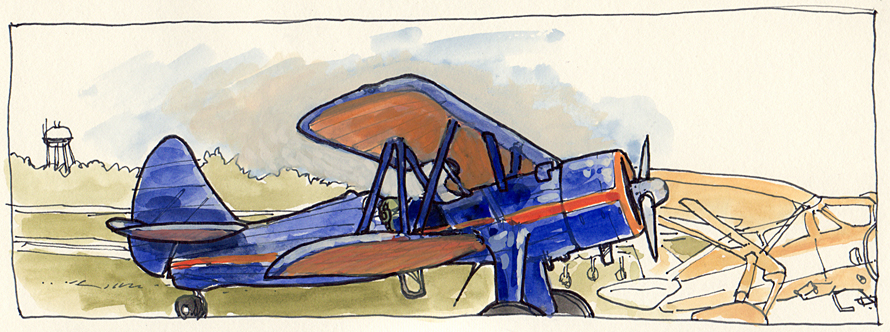
I thought I might be able to take my sweet time with drawing the airplanes there. However, the whole concept of the "Fly In" was that aircraft were coming and going all day long! I had to sketch faster than usual, so there are more "mistakes" in my drawings. I tried some opaque over-painting to "fix" a couple of these sketches. I'm not so happy with the two shown below. But even with "mess-ups", I learn something.
The yellow plane flew off, just as I was starting to draw it...the photo below shows it as it taxied by. The blue bi-plane came and went several times, giving rides, but always ended up at the same spot.
Okay...this next series of photos just made my whole day!! This cute little dog flew that tiny little plane...almost all by himself! He let that guy in the red t-shirt come along for the ride...probably was a good friend of his.
Time to suit up!
Please return your trays to their upright positions...
Clear the runway...we're outta here!!!
The pilot in the blue bi-plane did a fun "fly by" at the end of the day, leaving a trail of white! What a great finish to a very fun day!
Saturday, August 17, 2013
Saturday, August 10, 2013
SCULPTURE - Monster Heads! Pt.2
Just an ordinary day on KAIJU BEACH!
Welcome to part 2 of a new series I've started...Monster Heads! Let's jump right in. As before I begin with a basic armature of a nail in a wood base, add some wire, then aluminum foil to fill out the shape. This time, I was strongly influenced by an image on Discovery Channel of a cottonmouth water moccasin snake that was striking at the camera. I didn't have a real game plan (which is part of the fun of these sculpts). In my mind's eye, I also thought about giant cat fish, moray eels, deep sea viper fish and just made things up as I went along.
Here is the roughed in shape of the creature.
Below shows of some of the changes I made as I went. This is at the base of the neck area. At first I thought of keeping it smooth like a catfish's skin. Then I thought about making some gills. I didn't like where that was going, so I just carved out the bulk of the shapes. I liked how that looked (a purely random thing occurring here). So I built up some "ribs", then dug out some smaller shapes. I'm not sure WHAT they are now...could be gills...could be land-lungs...could be something that flares out when the monster is mad!
I made the teeth from "firm" Sculpy (lower part of the photo), and also the giant "barbs" for the spine. I have wire inside the longer spike bits for extra support.
Below are images of the teeth and spikes added, replacing the rougher version of those parts. The shiny gloss to the sculpture is from oder-less paint thinner which helps "melt" the surfaces a bit, and blends the forms to a smoother finish. I used ball bearings for the eyes.
Here is part of the painting process. I gave everything a coat of green acrylic first...then gave it a wash of thinned down black (so it would sink into the crevices of the detail). Then I started glazing and dry-brushing with the colors I wanted. I did another wash of blue on top...and repeated these steps multiple times. The shot on the lower right is where I ended up. I painted it all with a "high gloss" acrylic varnish, since this needed to look "wet" from the ocean.
Here are some views of the final Sea Monster!
Welcome to part 2 of a new series I've started...Monster Heads! Let's jump right in. As before I begin with a basic armature of a nail in a wood base, add some wire, then aluminum foil to fill out the shape. This time, I was strongly influenced by an image on Discovery Channel of a cottonmouth water moccasin snake that was striking at the camera. I didn't have a real game plan (which is part of the fun of these sculpts). In my mind's eye, I also thought about giant cat fish, moray eels, deep sea viper fish and just made things up as I went along.
Here is the roughed in shape of the creature.
Below shows of some of the changes I made as I went. This is at the base of the neck area. At first I thought of keeping it smooth like a catfish's skin. Then I thought about making some gills. I didn't like where that was going, so I just carved out the bulk of the shapes. I liked how that looked (a purely random thing occurring here). So I built up some "ribs", then dug out some smaller shapes. I'm not sure WHAT they are now...could be gills...could be land-lungs...could be something that flares out when the monster is mad!
I made the teeth from "firm" Sculpy (lower part of the photo), and also the giant "barbs" for the spine. I have wire inside the longer spike bits for extra support.
Below are images of the teeth and spikes added, replacing the rougher version of those parts. The shiny gloss to the sculpture is from oder-less paint thinner which helps "melt" the surfaces a bit, and blends the forms to a smoother finish. I used ball bearings for the eyes.
Here is part of the painting process. I gave everything a coat of green acrylic first...then gave it a wash of thinned down black (so it would sink into the crevices of the detail). Then I started glazing and dry-brushing with the colors I wanted. I did another wash of blue on top...and repeated these steps multiple times. The shot on the lower right is where I ended up. I painted it all with a "high gloss" acrylic varnish, since this needed to look "wet" from the ocean.
Here are some views of the final Sea Monster!
That's it for this post. I'll be making more of these from time to time, for sure!
Tuesday, July 30, 2013
SCULPTURE - Monster Heads! Pt.1
My family and friends who know me well are familiar with my love of GIANT MONSTERS! I have grown up watching GODZILLA and just about any movie with humongous creatures in it. This summer, one of my favorite movies is "Pacific Rim" where giant "Mech Robots" piloted by humans defend the earth against "Kaiju" (a Japanese word for...you guessed it...giant monsters).
Since most of my projects take such a long time, I decided to try some quicker sculpture "sketches" for a change. No preliminary drawings...just winging it as I sculpt. So, for fun, I'm starting a series of "Monster Heads". This is the first of more to come!
I won't belabor the process...it's similar to all of my other sculpture projects posted on this blog. I began with a nail hammered into a piece of wood I got at a craft store. After wrapping the nail with wire, I added aluminum foil to fill out the bulk of the shape. Then sculpey is applied, and away we go!
Here is the basic creature. I didn't take a bunch of photos along the way, because the shapes kept changing as I played...I didn't want to slow down to snap some pics. The "pink" clay is "super sculpey", the gray is a mix of "super" and "firm sculpey". The "firm" is too hard and crumbly.
Next, I started adding details...bumps, wrinkles, cracks, scars. I really didn't take a lot of time fussing with all the details...just wanted to lock in on the essence of what the character looks like.
The painting process takes a while...and again...I didn't take a bunch of photos. These pics give an idea of the "glazing" that I do. I started with a base of red acrylic...then a wash of watered-down black. I then "dry brush" colors on top, building subtle transitions as I go. This is repeated over and over until I get what I like.
Below is the final color scheme.
Just for fun, I decided to goof around with the colors in Photoshop...just to see what other monsters of this species might look like where ever they come from.
That's it for now...got to go make another monster head!
Since most of my projects take such a long time, I decided to try some quicker sculpture "sketches" for a change. No preliminary drawings...just winging it as I sculpt. So, for fun, I'm starting a series of "Monster Heads". This is the first of more to come!
I won't belabor the process...it's similar to all of my other sculpture projects posted on this blog. I began with a nail hammered into a piece of wood I got at a craft store. After wrapping the nail with wire, I added aluminum foil to fill out the bulk of the shape. Then sculpey is applied, and away we go!
Here is the basic creature. I didn't take a bunch of photos along the way, because the shapes kept changing as I played...I didn't want to slow down to snap some pics. The "pink" clay is "super sculpey", the gray is a mix of "super" and "firm sculpey". The "firm" is too hard and crumbly.
Next, I started adding details...bumps, wrinkles, cracks, scars. I really didn't take a lot of time fussing with all the details...just wanted to lock in on the essence of what the character looks like.
The painting process takes a while...and again...I didn't take a bunch of photos. These pics give an idea of the "glazing" that I do. I started with a base of red acrylic...then a wash of watered-down black. I then "dry brush" colors on top, building subtle transitions as I go. This is repeated over and over until I get what I like.
Below is the final color scheme.
Just for fun, I decided to goof around with the colors in Photoshop...just to see what other monsters of this species might look like where ever they come from.
That's it for now...got to go make another monster head!
Subscribe to:
Posts (Atom)