Run for the Ozark Hills...KING HOG ATTACKS!
Hard to believe it...but I started this project officially TWO years ago! I had ideas of making a sculpture of an epic battle between two Giant Monsters: "KING HOG vs BULLZILLA" (Click the link to see the backstory.) But it took seeing the movie "Pacific Rim" last year to get the ball rolling. Granted, I may never do the full sculpt, but at least I've got a fun Monster Head series going now. And I love making the "mini posters" of the creatures in action!
For any fan of the ARKANSAS RAZORBACKS, you'll see the inspiration for this creature. For those who have followed my blog, you'll be familiar with the general process I use.For the other three monsters in this series, I did not create any sketches beforehand...I just let myself be surprised where things would end up. But when I was having a new clutch put into my car a few months ago, I just figured I'd use the time to kick around some drawings of how KING HOG might look. I wanted to exaggerate the tusks, and give him some "razor sharp" spikes on his back.
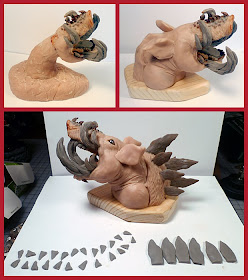
The project started with a wooden base and a nail to secure the foil that forms the core. I often do a loose sculpt to get general proportions in place. This will be totally replaced bit by bit with more refined elements. You'll note the ball of foil with a dowel in it. This was going to be the head, and I could rotate it for the best angle for "dramatic effect". I decided not to use it with the rough sculpt. But later changed my mind and redesigned the whole thing WITH the head as a separate piece.
Here are the various tusks and teeth that I baked separately. The gray color is from "Sculpy Firm", mixed with the pink "Super Sculpy" for better detail. I then built a set of jaws with the teeth in place, and baked it again, so I would not keep messing them up with the rest of the sculpting process.
I worked from the snout to the back, adding details and fleshing out the forms. As with the teeth, I made the spines separately, and baked them before putting them in place.
In the course of handling the sculpture, I found that the base had some cracks developing where I had quickly sculpted some rocks. So I had to redo that area with a few simple shapes of clay. Then I added a mixture of sand, small gravel and glue, to give the base some texture.
Here is the final sculpted piece before painting it.
Now comes the paint job...I always enjoy this phase of the project...it's the icing on the cake! I started everything with a base coat of RED acrylic, since that is the proper color for any self-respecting razorback. I then added a very thin wash of black, to pop the detail. After that, its just a matter of adding multiple layers of dry-brushing and glazing until I am happy with the results.
This is the finished color for KING HOG...
Here is the current lineup of my KAIJU MONSTER HEADS. I'm sure there are more to come!


Mississippi State felt those fangs last night! Mom
ReplyDeleteAll I can think of is a monster from Pacific Rim when I see these monsters. You need a giant robot to fight them all!
ReplyDeleteI wish you could create a Star Trek like scene where the captain is battling some copyright free version of the Gorn in back of a alien rock background. I'm sure you could tweek it so it doesn't look too much like Star Trek.
ReplyDeleteThanks Ferengi...I was definitely inspired by Pacific Rim. But to do the kind of mechs in PR is beyond my technical skills...that's all computer generated! Though a "goofy" robot series has been on my mind for a bit...a bit more beat up and "hand made".
ReplyDeleteAnd to do a Star Trek-like thing that is close but "not too close" seems to be undoable if it's to look like Cap'n Kirk. There would be some licensing problems there for sure. But to be inspired by these influences...can't help but be!!!
Congratulations nice work!
ReplyDeletea question......how to cook the firm with the gun?
thanks
Mario...thanks! As for using the heat gun...use it with CAUTION! I got mine at the hardware store...I think Black and Decker, perhaps. It's the kind for stripping paint, etc...two settings, low or high. I use it to "cook" my sculpts without having to put the whole thing in an oven each time. Best advice...keep the gun MOVING at all times! I have burned some pieces if I hold the gun on one spot too long. Usually only need about a 5 minute timeframe to get stuff hot enough. When it cools down...it's firm. But the clay will be "bendy" while hot...don't touch it! I have seen some sculptor's work (various blogs), where they protect areas they don't want cooked with aluminum foil (only exposing the clay to be heated up). I have not tried that. Just be careful...you can catch stuff on fire...no joke. Hope this helps!
ReplyDeleteThank you, you've been very helpful
ReplyDelete